
 I had heard of Quark before, but I had never tried it. Quark is a soft fresh or unripened cheese that is quite easy to make. I first tried quark when I made my Hot Pepper Jelly a few weeks ago. If you remember, I went to the grocery store to find a cream cheese and found that all the varieties of cream cheese available to me, organic or not, contained locust bean gum. And several varieties of non-organic cream cheese had an ingredient list a page long! They are definitely not making the cut these days. But the package of quark that I bought was simple. It was milk and enzymes and salt. And when I brought it home it was soft, fresh, creamy and easy to spread. Not hard and blocky like typical processed cream cheese is. Of course….I had to figure out how to make my own.
And wouldn’t you know it, Sally Fallon has a recipe for it in Nourishing Traditions. (Aren’t you ready to buy this book yet?) I have actually wanted to make this recipe because when you make cream cheese you also yield the all important whey, which is the back bone of all the lacto-fermented vegetable recipes that Fallon has throughout her tome.
First thing is first. You need cultured yogurt, buttermilk or raw milk. Many states do not sell raw milk. This is such a big controversy. New York State only allows farm sales of raw milk. And that means you have to go to the farm. So while I buy my milk directly from the farm that “grows” it, they could not legally sell me raw milk at the farmer’s market. So I bought cultured buttermilk from Hawthorne Valley Farm. I know they are a farm that I can trust for biodynamic organic products.
And making the cheese is pretty easy. You put the buttermilk (or whatever you are using) in a covered bowl (I used a 2.5 quart pyrex glass bowl with a fitted plastic lid) and let it sit at room temperature for 1-4 days. It is pretty cool out now, so my buttermilk sat for about 2 and a half days. Here you see it on Day 1…

Now you see it on Day 2…. 
And finally Day 3… 
Do you see how it is separating a little? I expected great clumps of curds like cottage cheese. But it wasn’t like that at all. The buttermilk just started to look….grainy. At that point I put a large bowl down and placed my colander inside. I lined the colander with the thinnest clean burp cloth I could find, something that is similar to cheesecloth. Please, use cheesecloth..I am cheap and will use a burpcloth because it is lying around, and I don’t have anyone to burp anymore.
The whey and the curds will begin to separate, with the whey falling through the cheesecloth and colander and into your bowl below. Make sure you save that whey, it has active cultures that are perfect for using to fermentvegetables (think sauerkraut, kosher dill pickles or kim chi, all fermented vegetables) and all manner of restorative drinks. Next take the corners of your cheesecloth so that the buttermilk curds are wrapped up like a pouch. I took the pouch and tied it a wooden spoon. Then I put the wooden spoon across my tallest stock pot so that the pouch was freely hanging and not touching the bottom of the pot. Forgive the coffee cup in the picture-it was 5:30AM when I snapped most of these pics. I let the curds strain like that for about 12 hours overnight. I had to go to work and couldn’t finish it the next morning so I parked in the fridge for the day, and when I returned from work that night, the cloth had absorbed enough moisture and the texture was perfect. See here when I unwrapped my package.
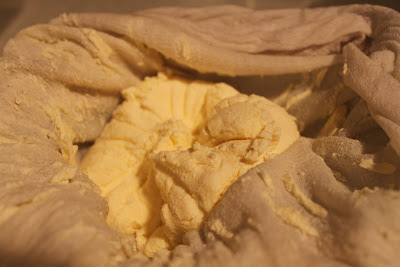
My cream cheese is great. The flavor is unexpected. I am curious to let it develop longer next time for a more sour taste. And while I like the buttermilk variety, I think I would like to try the recipe with yogurt for a different flavor. I have eaten my cream cheese, and there is no stomach upset. It is smoother than store bought cream cheese. Sadly, DH has been a hard sell but he did try it and said he like the texture. Some of the things I do are out of his comfort zone! I even saved the whey and have been adding it to some drinks that Fallon recommends for strength and health. I feel great! There is no need to buy yogurts labeled ‘probiotic’ that are pumped full of sugar and HFCS when you can do this at home. There are real probiotics in this cheese and whey. Plus there was no special equipment to buy. I hope that you will try this. Making cheese at home seems so intimidating and potentially toxic, but actually, it was pretty easy. It wasn’t that much work, but I was anxious waiting! I am really proud that I did this!
This post is part of Food Renegade's Fight Back Fridays!
The pictures look awesome...I'm so intrigued. I think my DH will definitely be a hard sell...but maybe I won't tell him (believe it or not, he won't notice the big pot or cheese cloth!). Thanks for sharing this!
ReplyDeleteThis is what they call requeson in Mexico. It's is my FAVORITE kind of cheese. I had my MIL's first and have bought here in Mexican tiendas (stores. I don't know if I'm brave enough to make it myself...we'll see.
ReplyDeleteI've made yogurt cheese lots of times but never thought to allow the yogurt cultures to multiply before straining the curd. I admit I'm one of those opposed to consuming raw milk but I'm a huge fan of plain yogurt and recently acquired a yogurt maker. Once I get my culture established, I'm going to try using my own yogurt to make quark. Thanks *so much* for sharing this!
ReplyDelete